This blog is about youngsters finding an old Data General Nova 2 minicomputer, getting it to run, restoring it, learning all about it and having fun with all the stuff that goes along with it.
- SMB Retro Proxy
Have you ever been in the situation to have a very old machine and you wanted it to talk to your modern day fileserver in a secure manner? I know the following presented solution not ideal but better than nothing. Remember that we’re dealing with legacy hardware here that some cheapskate machine shop owner is too thrifty to replace, or with our own personal part time joy of dealing with retro hardware, so this is by far not a secure solution. It is about to come one step closer to “as good as it gets”.
In case you might find almost the same text on github: I posted that there 🙂Lets go for it! Meet the concept of SMB-Proxy 🙂
Having several Windows for Workstations 3.11 computers in the basement and also several customers running old cnc routers/mills/lathes what have you with old style operating systems, I figured it was time for a somewhat safer solution that just to enable SMBv1 on the Windows fileservers directly.
The idea is very simple: We put something inbetween the old clients and the modern fileserver and make sure, there is no other way for anything in that network with the old clients to leave that network. The only thing possible to do in that network, will be to connect to that SMB Proxy.
Step 1: Get managed switches and replace unmanaged switches.
Step 2: Create a new VLAN for the old clients and make a new subnet for them on your firewall in case you want to route some traffic to somewhere else, which I definitely do not recommend for production machines, other than the case that you might want to have some fun with an Internet Archive Proxy or visiting some BBS.
Step 3: Create a new virtual machine with your favorite flavour of linux (in my case debian) on your server that has one network interface in the subnet of your fileserver and one network interface in the subnet of your old clients.
Step 4: Install Samba 🙂
Step 5: Create a new folder in your filesystem where you want to mount the SMB Share that you want to be proxied, lets say it is called “Software”.
Step 6: Create a file in the /root directory, maybe call it software-share-credentials, that has the credentials to your modern day share in it. They should be in the format:
username=username
password=password
whereas after the = you have obviously your real credentials.
Step 7: Mount your modern fileserver share to software with fstab like so:
//fileserver.nerdsh.org/Documents/Software /mnt/FileserverProxy cifs user,uid=1000,gid=1000,vers=3.11,credentials=/root/FileserverCredentials,auto 0 0
Step 8: Create a user on your Linux machine that matches the user on your old client. It is important, that this user has a password no longer than 8 letters, best compatibility is given with an all lowercase username with an all lowercase 8 letter password.
Step 9: Make your samba config! I suggest in your smb.conf to be something like this:[global]
bind interfaces only = yes
# this is the interface in the vlan of the old clients! do not bind this SMB daemon to any other network!!! It is dangerous and very insecure!
interfaces = enp0s5
min protocol = CORE
netbios name = smbproxy
lanman auth = yes
client plaintext auth = yes
client lanman auth = yes
ntlm auth = yes
map to guest = bad user
workgroup = WORKGROUP
unix extensions = no
allow insecure wide links = yes
[share1]
include = /etc/samba/share1.conf
[share2]
include = /etc/samba/share2.confAnd in the config files for the shares you want to create which would for example be share1.conf
comment = Share1
path = ThisIsThePathToTheMountPointYouCreatedEarlier!
guest ok = yes
public = yes
browseable = yes
writeable = yes
force user = audiocrush #(YourLinuxUserThatHasPermissionsOnTheMountFolder!!!)
force group = audiocrush #(YourLinuxUserThatHasPermissionsOnTheMountFolder!!!)
create mask = 0775
directory mask = 0775
follow symlinks = yes
wide links = yes
case sensitive = no
default case = upper
preserve case = no
short preserve case = noStep 10: Reboot the whole thing and enjoy!
The “Oh I forgot” section:
Some WfW3.11 machines gave me still some problems.
I was able to overcome them by installing admincfg from WfW3.11 setup disk No. 8 like so:
In DOS:expand A:\admincfg.ex_ C:\windows\admincfg.exe
In Windows:
Open File Explorer
Find admincfg.exe and start it.
Click on Passwords
Disable Password Cacheing (this is apparently needed when accessing shares with user level security and samba has dropped share level security support already if I got that correctly)
Reboot the machine.Personal Reminders
I looked ages for that information and I never want to forget that stuff:
SMB.conf possible values for “min protocol” and “max protocol”:Possible values are :
- CORE: Earliest version. No concept of user names.
- COREPLUS: Slight improvements on CORE for efficiency.
- LANMAN1: First modern version of the protocol. Long filename support.
- LANMAN2: Updates to Lanman1 protocol.
- NT1: Current up to date version of the protocol. Used by Windows NT. Known as CIFS.
- SMB2: Re-implementation of the SMB protocol. Used by Windows Vista and later versions of Windows. SMB2 has sub protocols available.
- SMB2_02: The earliest SMB2 version.
- SMB2_10: Windows 7 SMB2 version.
- SMB2_22: Early Windows 8 SMB2 version.
- SMB2_24: Windows 8 beta SMB2 version.
By default SMB2 selects the SMB2_10 variant.
- SMB3: The same as SMB2. Used by Windows 8. SMB3 has sub protocols available.
- SMB3_00: Windows 8 SMB3 version. (mostly the same as SMB2_24)
- SMB3_02: Windows 8.1 SMB3 version.
- SMB3_10: early Windows 10 technical preview SMB3 version.
- SMB3_11: Windows 10 technical preview SMB3 version (maybe final).
By default SMB3 selects the SMB3_11 variant.
(Thank you Jeff Schaller on Reddit) - Taking Inventory

So the other day I was over at the storage site where we keep the old Nova 2 to check out in detail what we got in terms of hardware in the computer and maybe establish a serial Connection.
For making the serial connection I prepared an old Amstrad ALT-386SX portable computer my dad had still laying around. I figured the serial connection on that thing might be more compatible to old things than modern serial chips that mostly are just used with TTL voltages. I installed a copy of Kermit by the University of Columbia since it supports already a tonne of protocols and is able to emulate a very wide range of terminals, including a couple from Data General.
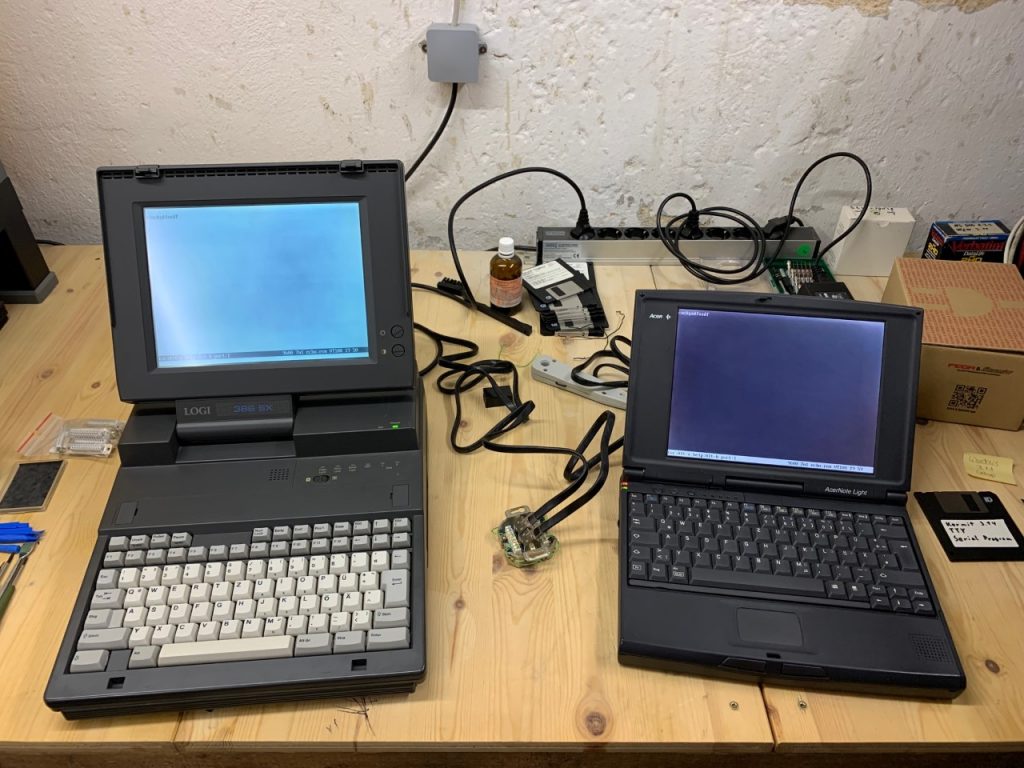
Here is a photo of the test setup in my basement – Connection established! After several attempts to figure out where the serial connection of the Nova 2 is, we found an important clue in the manual:
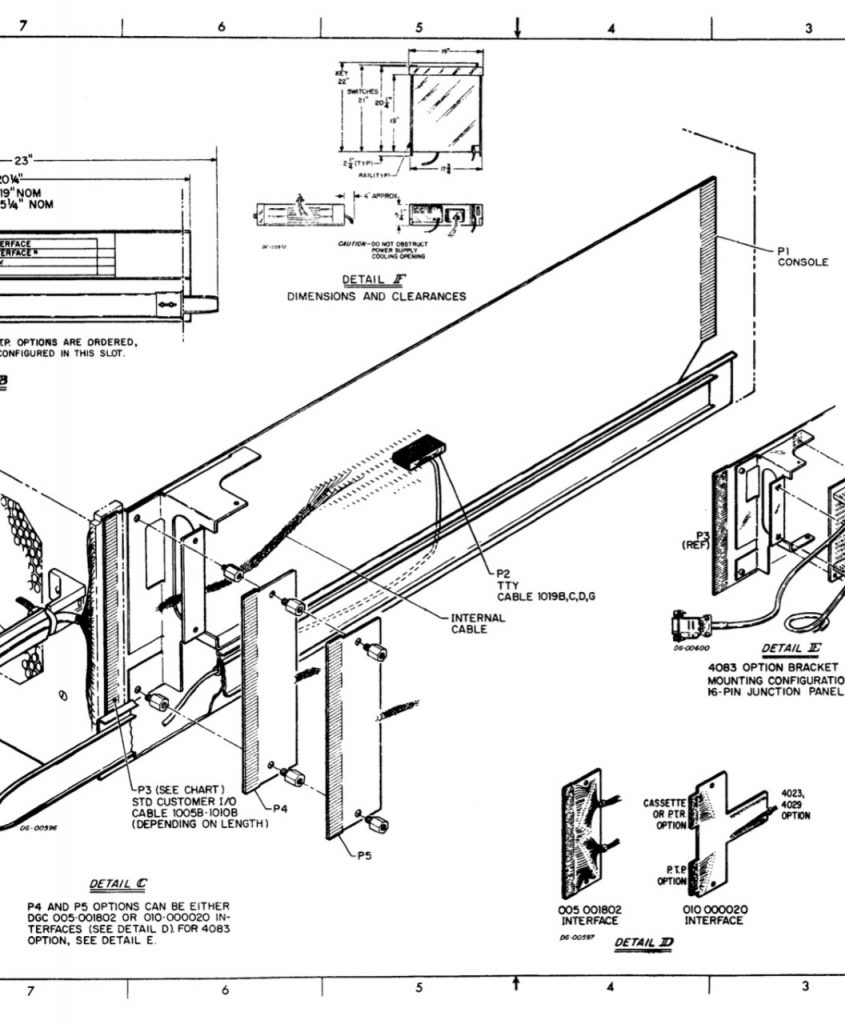
The connector is in the middle of the backplane, hidden amongst a vast amount of pin headers. 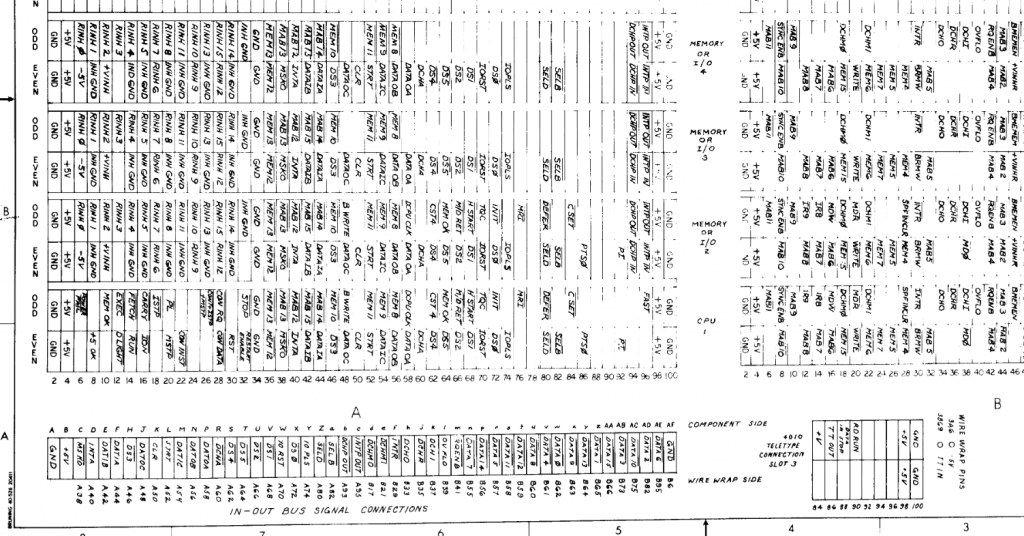
And here is even a discription of what these pins do. Now unfortunately we found out, that the pin assignments point us to something called a current loop serial connection. And since the contemporal terminals we got with this machine are not (YET) working. We are now unable to connect them to our software emulated terminal, due to a lack of hardware compatibility.
http://bitsavers.org/pdf/dg/Nova_2/Nova2_Schems_1973.pdfA next hint was a sticker on the basic IO board that says TTY 20mA. This means, that the serial connection does not require the usual TX, RX and Ground pins, but a VccTX, TX, VccRX and RX pin. A common ground is not necessary in this scenario, since the bits are not determined by voltage level like in a RS232 connection, but rather than by the flow of 20mA of electrical current.
So since this was quite a show stopper for the day, I decided to order a Wieseman und Theis current loop adapter for 30 bucks on ebay, since 20mA current loops seemed to be quite common in industry for machinery and automation, so these things can be found quite cheaply. While waiting for this to arrive, we showcase below an inventory of the boards in the computer with a short description of what they (supposedly) do:
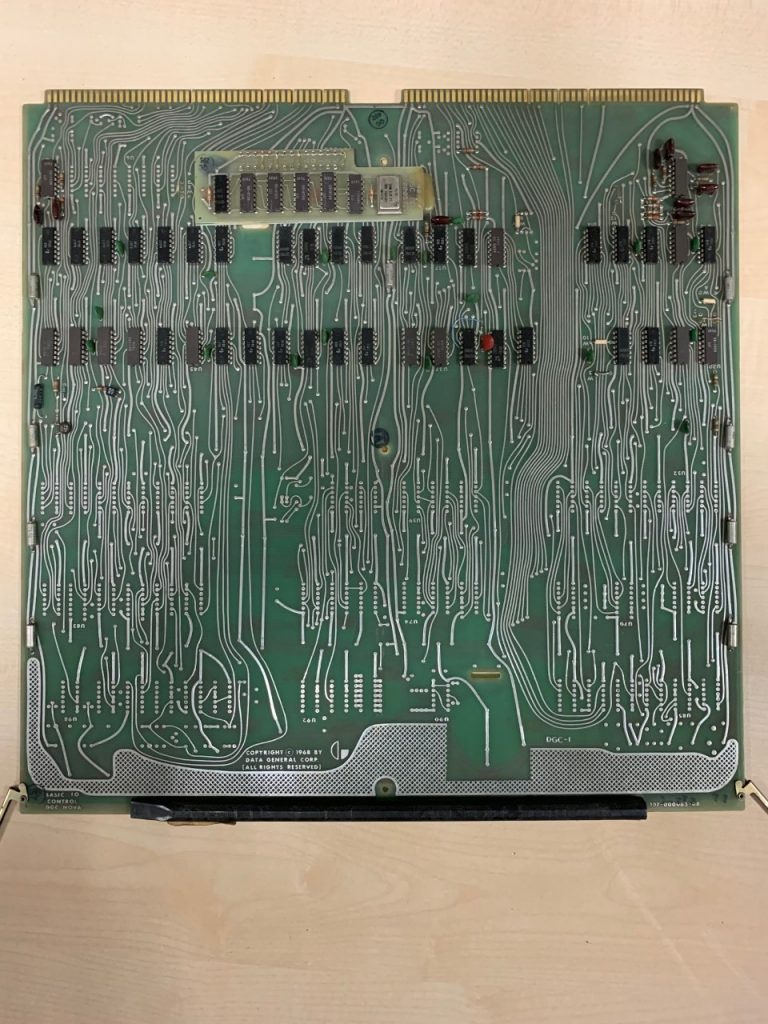
DG Basic IO Board
maybe for a second TTY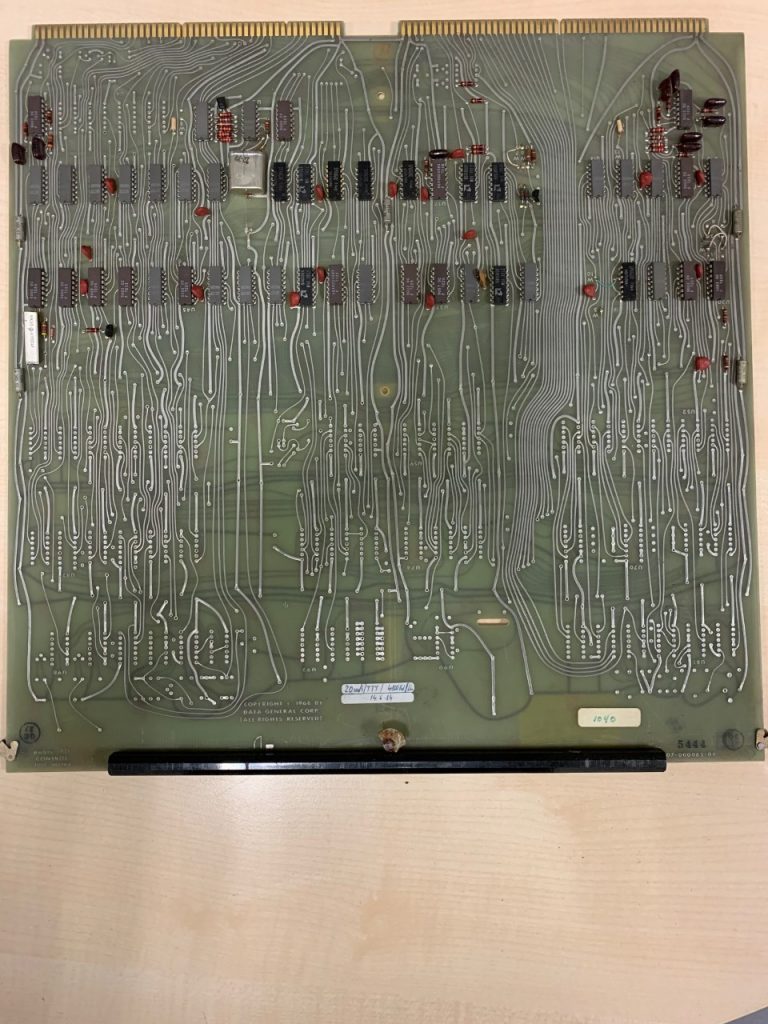
DG Basic IO Board
this was in the mandatory slot 3 for main TTY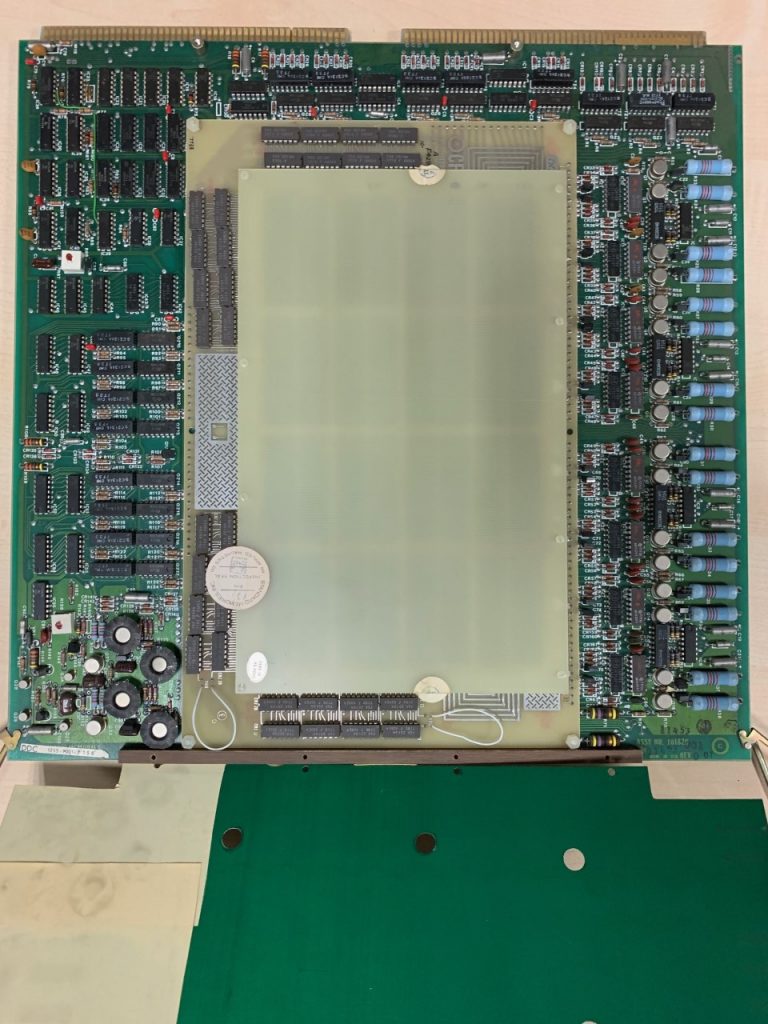
One of the two core memory cards
not sure how many kilowords of memory yet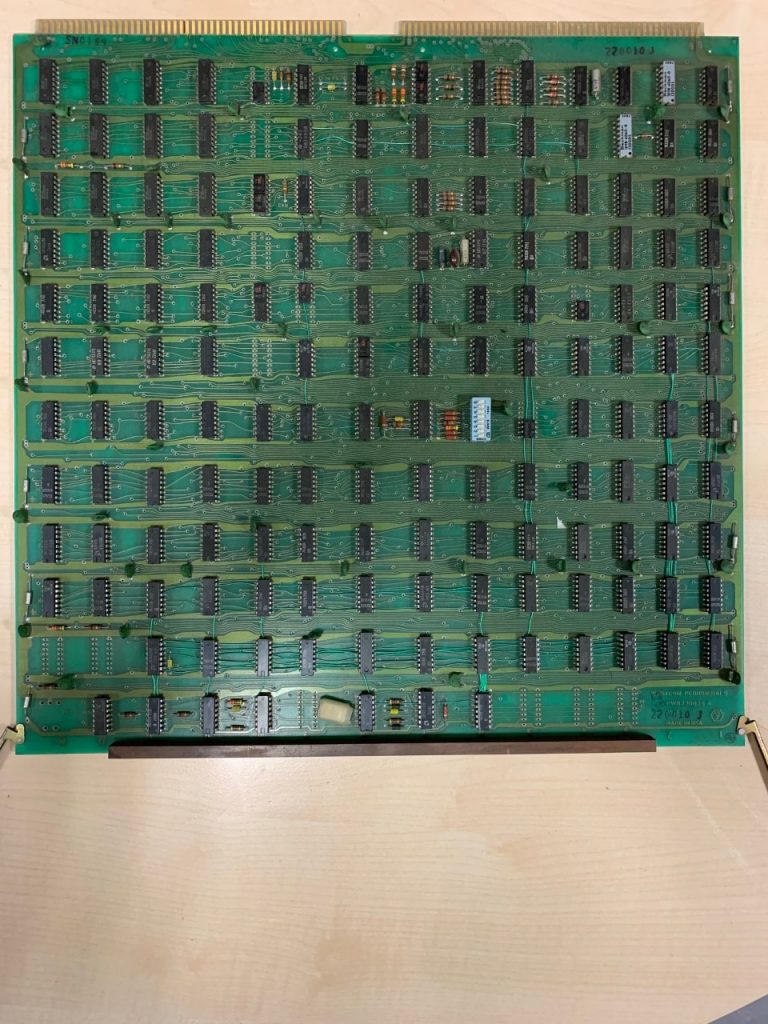
Hard Drive controller 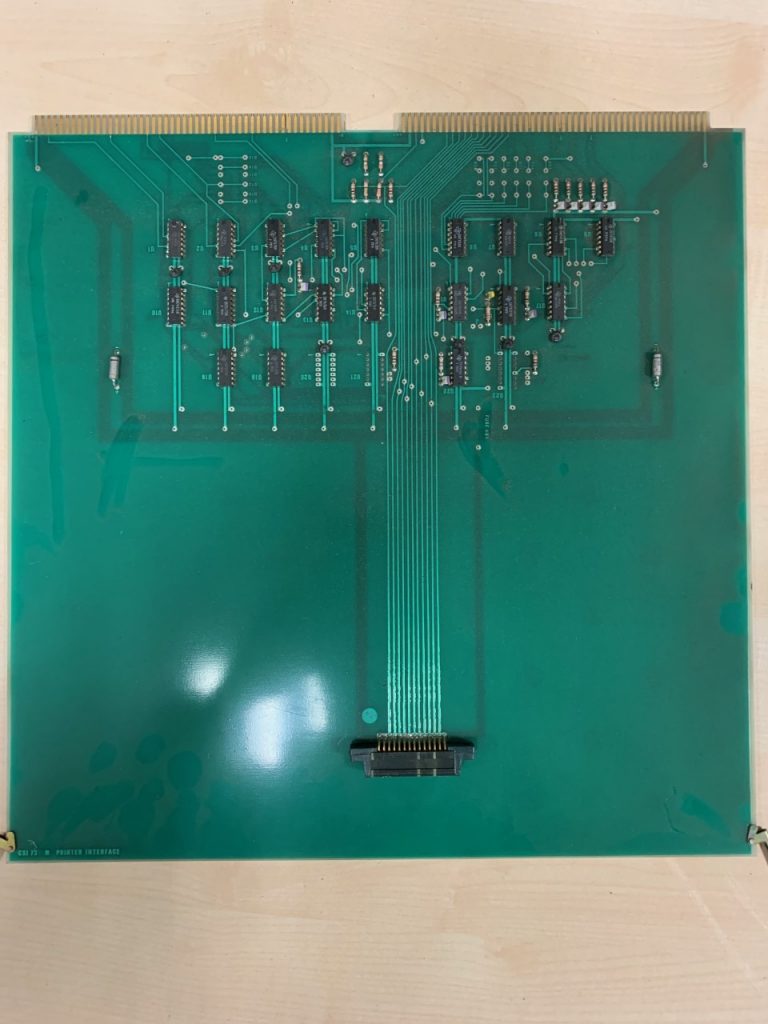
Printer controller 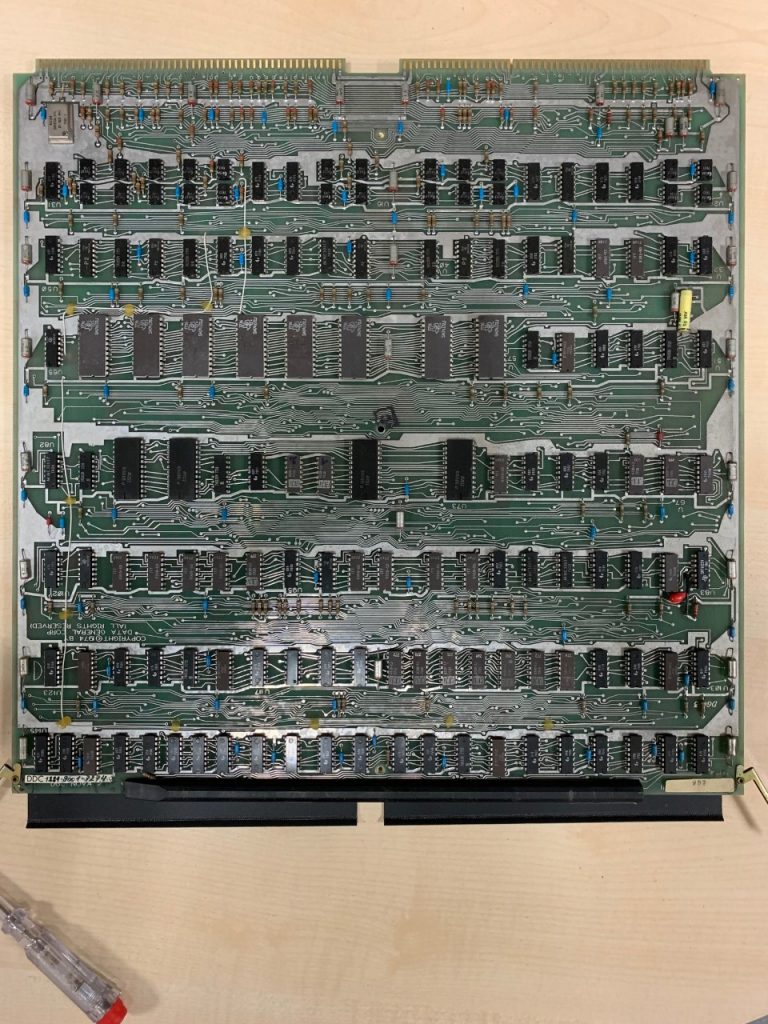
Main processor board 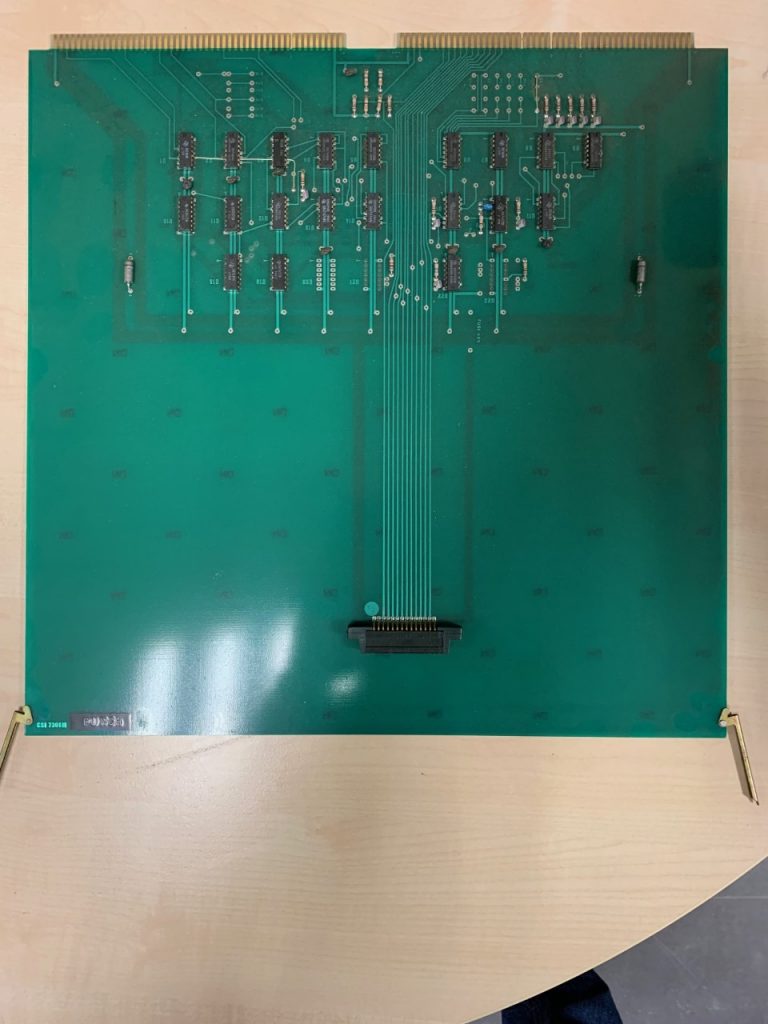
Paper card or tape punch 
Paper card or tape punch
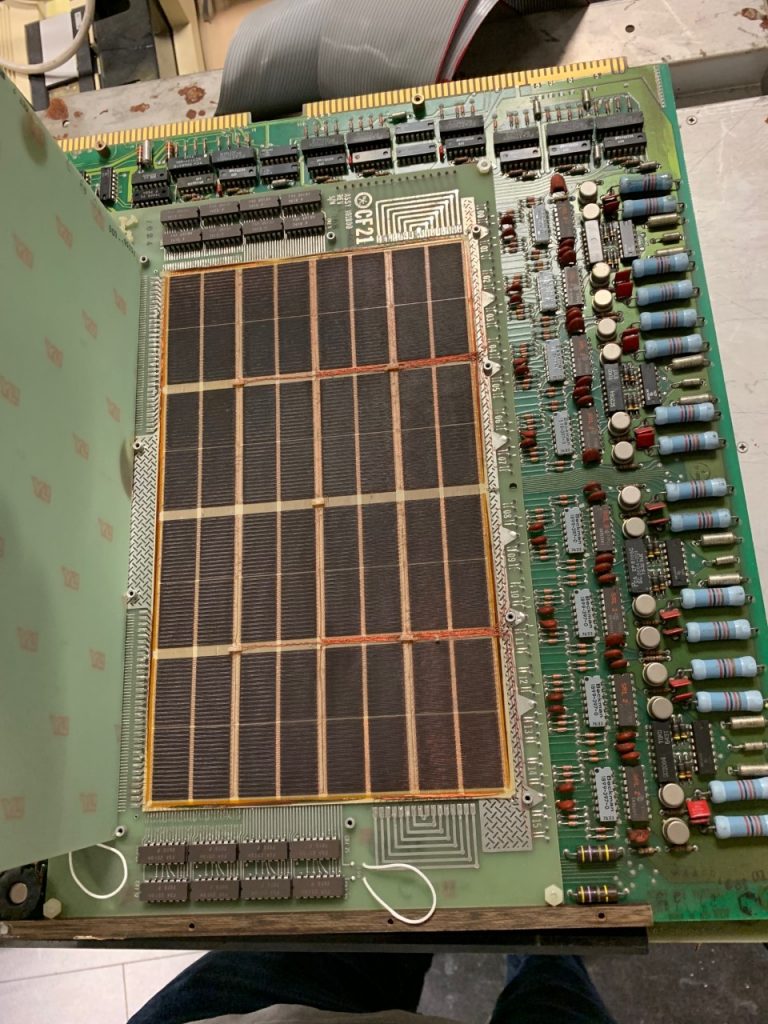
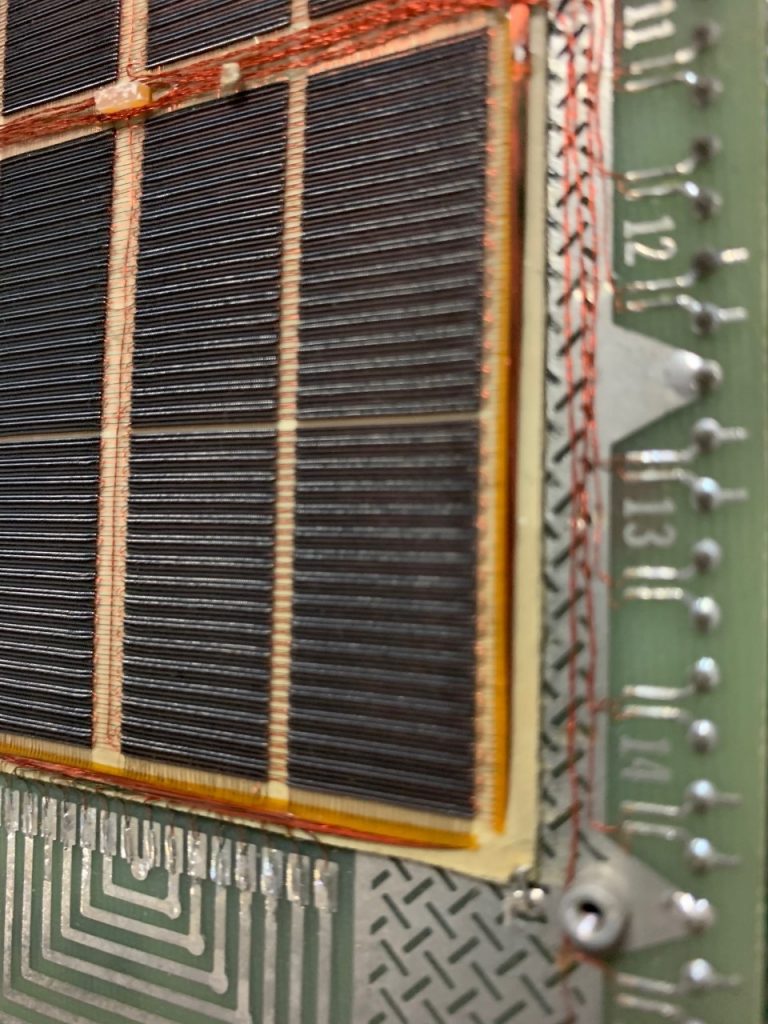
And now as a special treat, we carefully took the time to open one of the core memory modules, to show you the beautiful art and great craftsmanship that went into these things.If I’m correct, this thing is able to store 4000 words of data, in this computer since it is a 16-Bit system, this would mean 64000 bits of memory, or 8 kilobytes per core memory module (we have two).
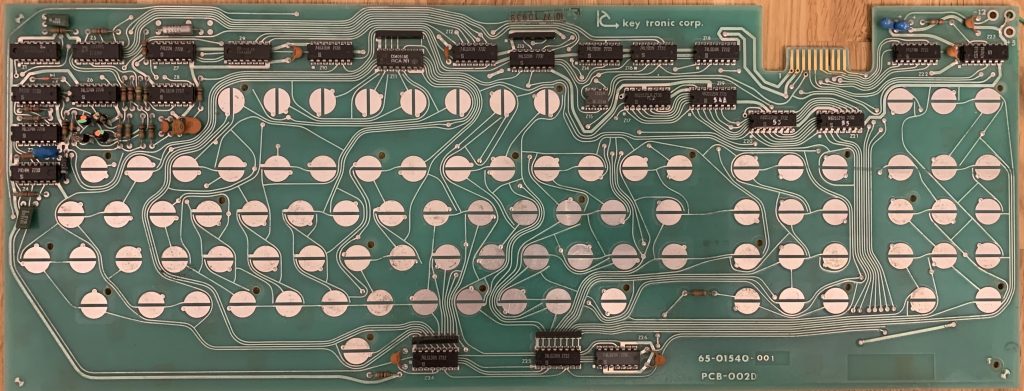
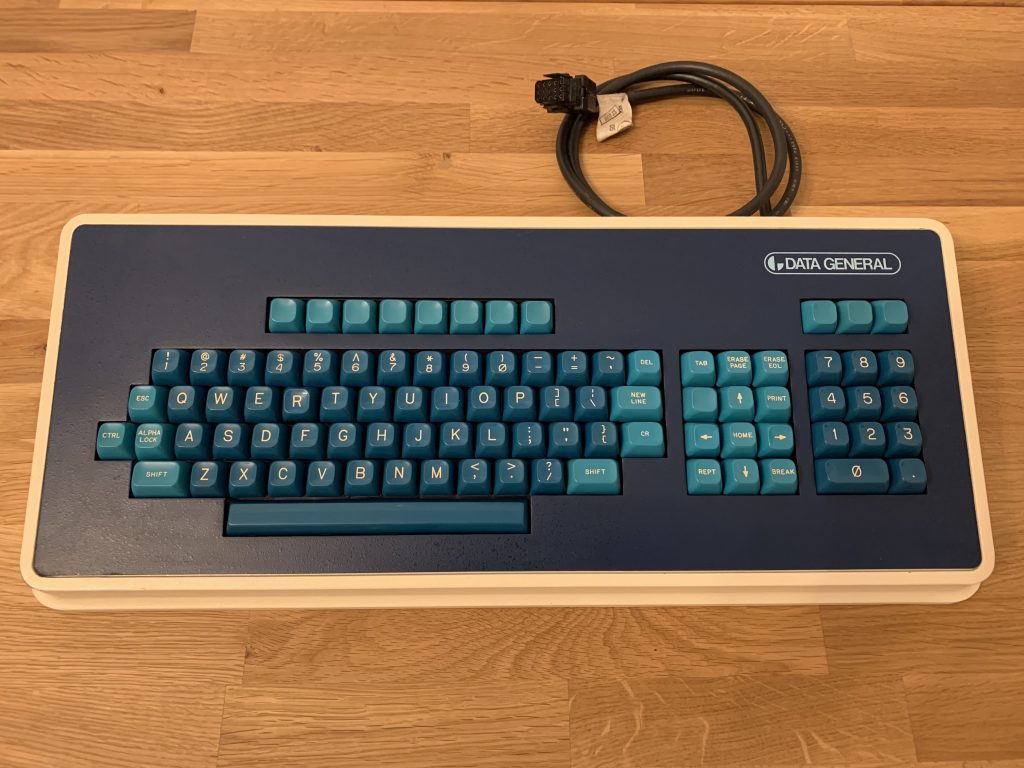
- That Ominous Keyboard
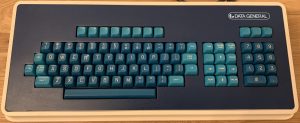
Starting the project, I picked the supposedly easiest piece of hardware out ot the bunch: The Keyboard!
It was in a very sorry state, at least by the looks of it. Unfortunately I don’t have a picture of it in that state but it was really dirty and crusty. I took it home to disassemble it and give it a good clean as well. I took a picture of the keyboard layout, disassembled everything, pulled the keycaps and washed every single one individually with a brush, some soda and windex. Afterwards I let everything dry and removed all the dust and dirt from the pcb, the keyswitches, vacuumed the case and so on. The pcb was, apart from the dirt in a very healthy state. no corosion or broken tracks. Even the lacquer was not crumbling on the traces. I remember C64s that looked like a plowed field in atumn.
Then it was puzzle time and at first I tried to put the keys back from memory but that didn’t take me very far. That was probably because the layout is a bit different from modern keyboards. Also notice the unmarked keys on the top. I wonder what they were used for. Maybe they are user programmable. According to the datasheet, at least the keyboard of the newer D100 Terminal has a ASCII code assigned to every key it seems.
Also one of the turqoise keycaps had a broken alignment shaft. Fortunately some CA-glue made quick work of it and now it works reliable.
Here are some shots of the stripped keyboard before and after cleaning:
A few things I noticed along the way:
The keyboard connector indicates to me, that it does not belong to the Dasher D100 terminal I got with the computer. According to some documents I found on the web, it should be an older model. This one features a 15 pin AMP connector, whereas the terminal just has a 9-Pin 2.54mm pitch single-in-ine dupont connector on it as depicted in the manual here:Also it appears, that the keyboard was not manufactured by Data General themselves, but they bought it from key tronic corporation as oem. But they did a very thorough job in designing a very nice keyboard that still feels great to type on even after ~50 years. In the pictures below you can see, that keytronic designed the keyswitches themselves. I’m not sure though if it will work without problems, because the switches have a plastic plunger (the white bit) with a piece of that weird old ?polyurethane? foam attached to the bottom with a conductive sticker on it. Unfortunately the foam is old and decomposing a lot, so there won’t be much life in these keys. Some are even missing, no clue how they got out.
Whats also interesting is, that the keyboards circuitry is made up almost entirely of 74 series cmos logic chips. The majority are made by Signetics, there is also one from AMD, RCA and National Semi each.So would the keyboard I got work with the terminal I got?
Probably not. I might analyze the pinout of the D100 in the future, but I’m almost certain that the fundamental design is different if there is almost double the amount of pins on the plug.
I found a post on the vogons forum.
https://www.vogons.org/viewtopic.php?p=531984#p531984
Apparently this guy was the designer of the Dasher D200 terminal and had to say that the terminal was all about getting the cost down. According to his post the keyboard just consists of a bunch of shift registers and analog muxes like this one here. Since the D200 terminal and its keyboard are a much later model than this keyboard here, I suspect instead of sourcing it out and live with what they got from their OEM, they rolled their own. They might have put further muxes and shift registers in the newer models to reduce the number of wires needed between the keyboard and the man unit. That would also explain going from that probably very expensive 15 pin monster to that flimsy 9 pin header plug which is way cheaper. In the manual I embedded on this page is also a diagram which roughly explains the way this keyboard is being read. (Page 5-3)Below is a galery with some moneyshots, enjoy:
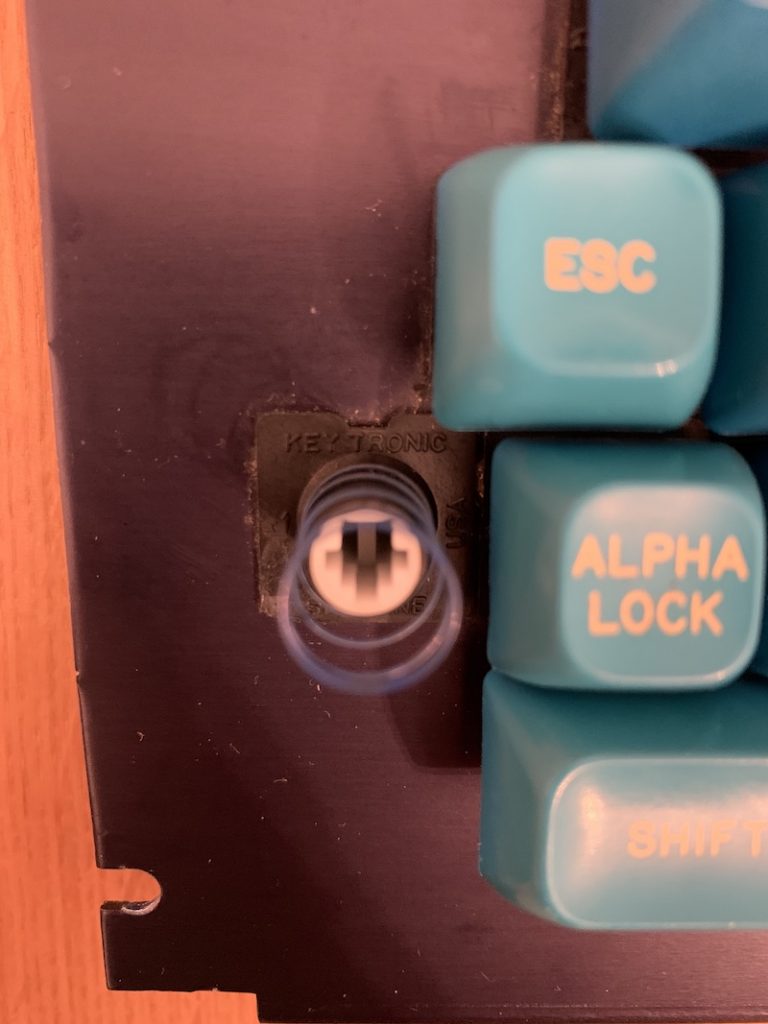
This one says keytronic on it. 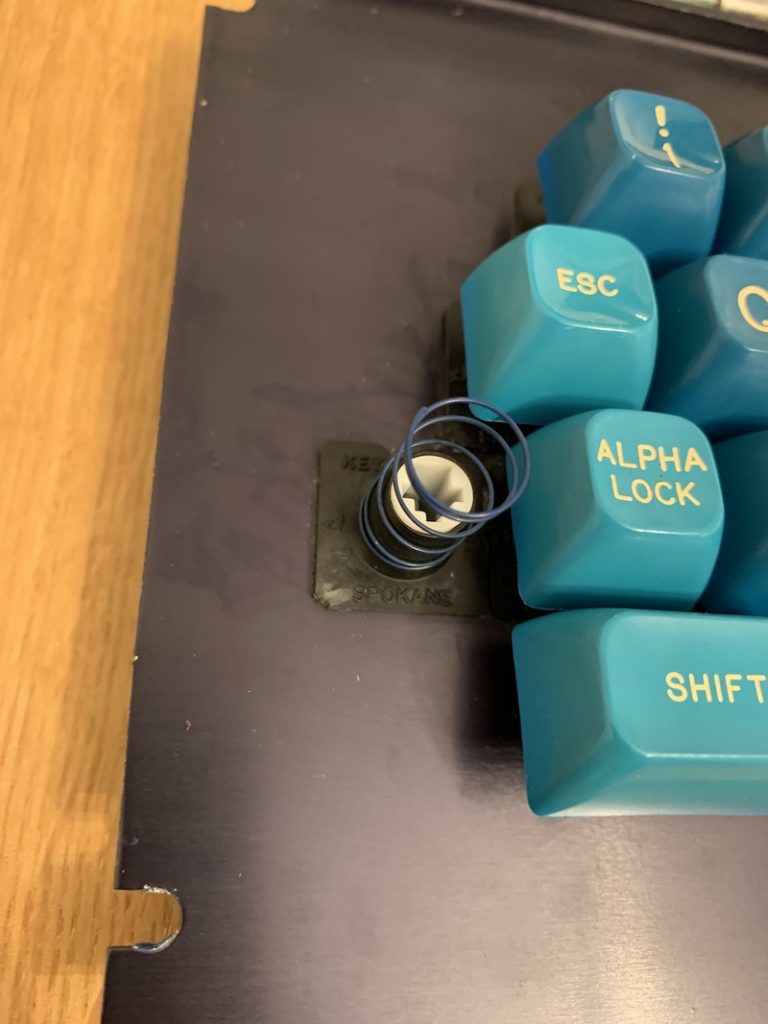
Maybe spokane is that particular model? 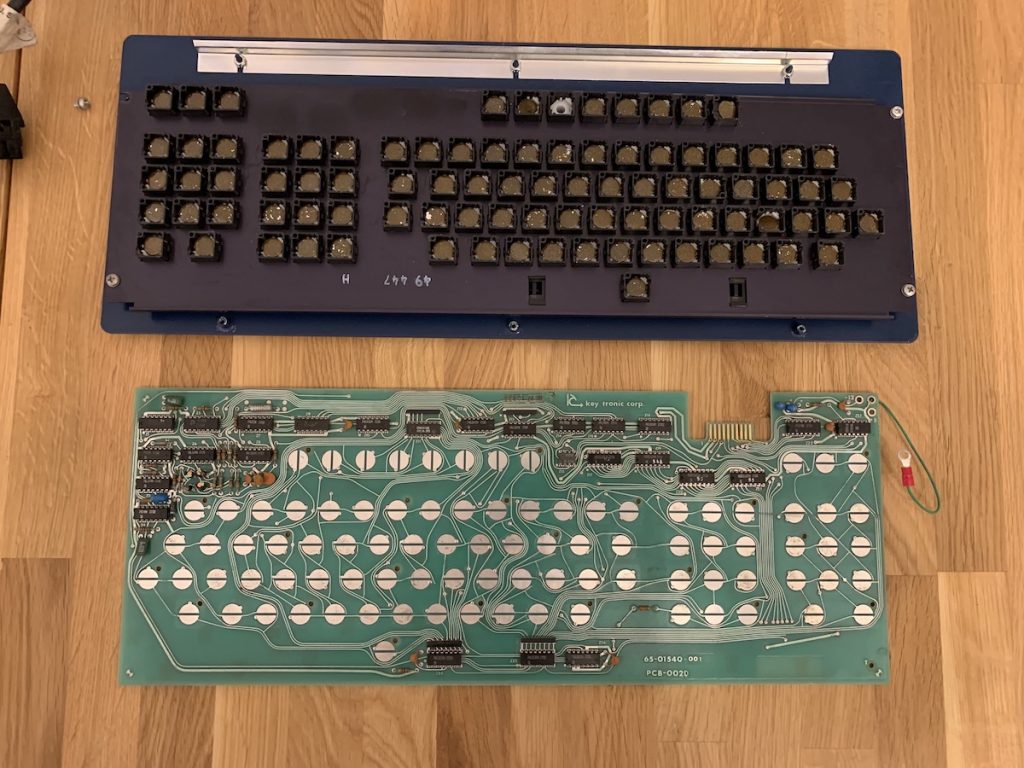
In the top part you can see the foam pads. 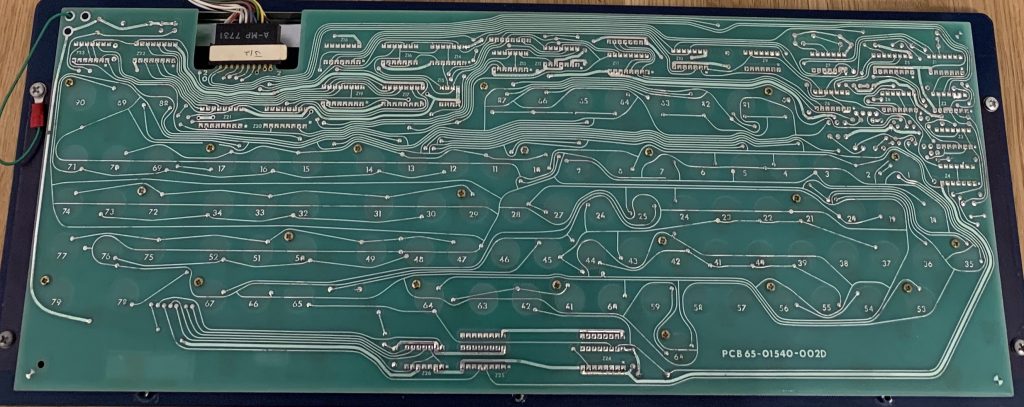
Neat and clean, I somehow like that design.
- A Few Pictures To Begin With

It started as a junkpile find.
As IT Consultant we went onsite to a customer project to review some stuff. As we went along a hallway in the basement of their building we suddenly stumbled upon a room that was filled with old hardware, about to be trashed. Curious as I always am, I sneaked in that room to just have a look around. I noticed a big 19″ rack in the far left corner. I went back and asked them for some light to investigate further. The guy showing us around agreed and was a bit surprised as well. We took a closer look at what appeared to be an awesome piece of almost forgotten machinery.
At first we had no clue what that was but it sure looked to be something that had to be saved from the claws of the junkyard scrapmetal press. Scattered through the room there were old components, open-reel magnetic tapes, paperpunch tape, a typewriter, old PBX parts as well as some ugly not very vintage 2000s era computers and monitors. But occationally between all these things, the odd other item popped up which seemed to belong to that huge machine in the corner. Soon we determined that in this room, there must be a complete mainframe kind of machine including terminals, hard drive and so on.
Some days later I had a nice talk to the boss of that company and he kindly agreed to donate the machine so that we could restore it to its old glory. To be seen by people and maybe so something more or less meaningful again. My boss was as well very kind and donated some of our company resources to pick it up and bring it to a safe location where I can work on it with some friends in my spare time.
After some research we determined that the machinery in question is a Data General Nova 2 Minicomputer, although “Mini” by now would just be a relic of time. In the days between these talks and picking up all the equipment I did a lot of research on the web to find out more what it was, what it was used for and how one might get this thing in good shape again. I almost couldn’t sleep for a couple of days because of all the excitement. I mean, it surely doesn’t happen every day that you find something that is almost twice as old as yourself and combines your profession as well as your hobbies and personal interests. It was a steep learing curve since I had never really much to do with computers older than from the early 1990s or electronics that consisted of discrete logic components rather than just a few micro controllers and ready made building blocks on an I2C bus.
Also information on these old systems seems to be really rare, so I hope to attract some attention with this blog and maybe some kind people who have some knowlege of these things so that it may be collected and preserved on here.But enough talk, here are some first looks on the equipment, enjoy!
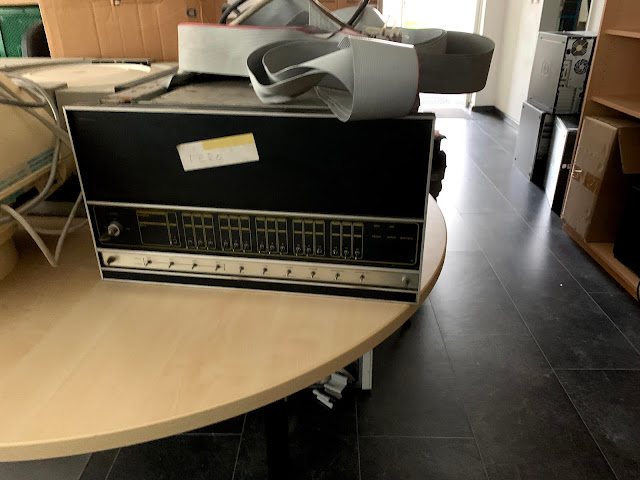
Behold, the Data General Nova 2 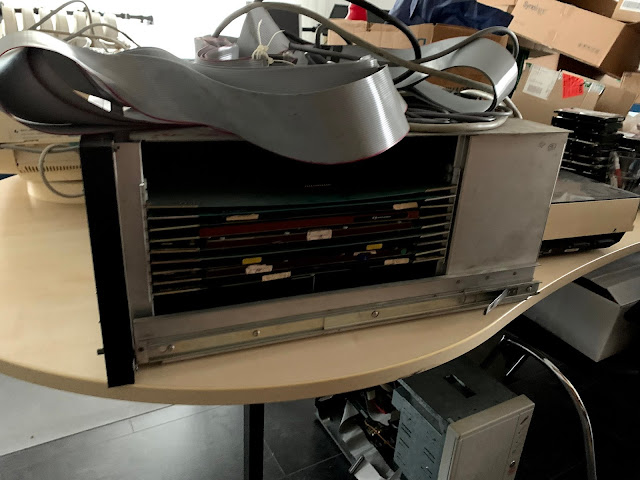
A look at all the modules 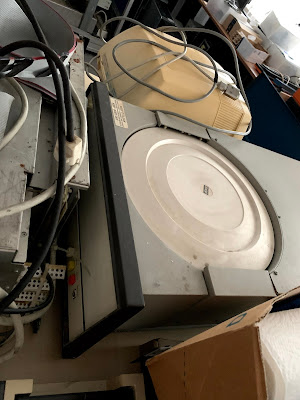
The hard disk drive 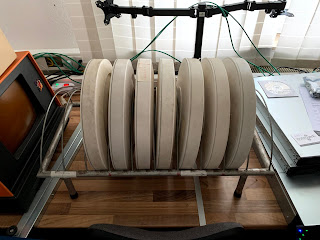
Along with some hard disks 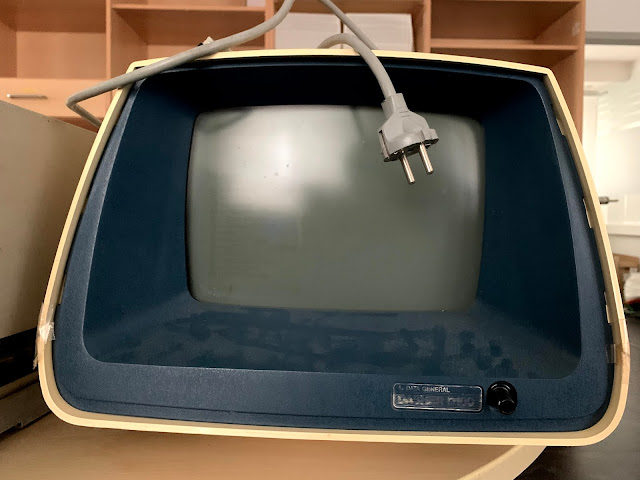
A original Data General Dasher 100 Terminal 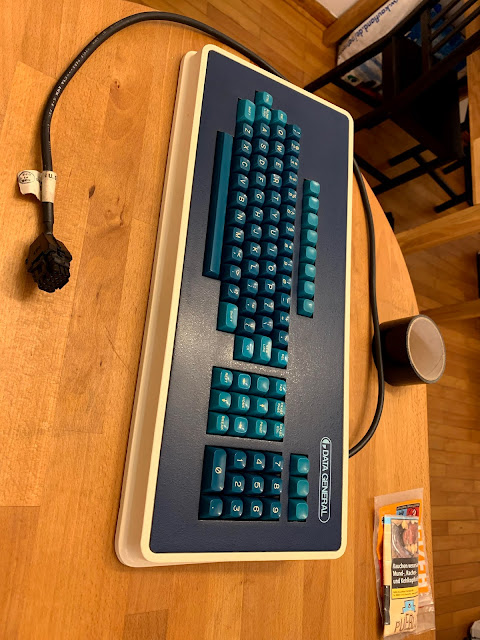
And a keyboard which apparently belongs to an older model which I couldn’t find 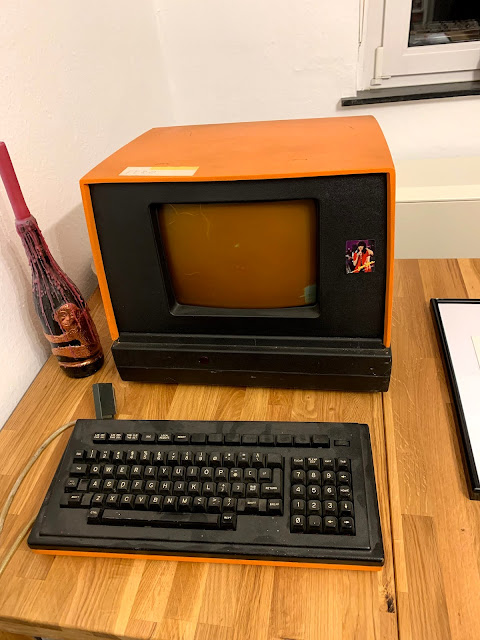
And finally a off-brand terminal which was apparently made to work with the Nova 2 by another company. But more on that in another blog post.
- Welcome To The Journey
This is the first entry to this site, mainly as a placeholder to see how it looks and help me set things up.
First real content coming soon…